I
hated discarding empty margarine and whip cream containers. I recycled them and filled them with twist ties, pasta, dry beans, and leftover meals. I would put masking tape labels on the
outside. I love
doing crafts and I laughed at my tacky recycled containers. I knew
I could do a
better decorating job! I found unused scrapbook paper and covered my
empty margarine and whip cream containers with it.I covered the wrapped
containers witha
protective coating of white school glue.I replaced the paper whenever it becamesoiled or torn.
My creative juices started flowing. I also used seasonal wrapping paper. I did a display of containers covered in left over Christmas,Easter, and July 4th wrapping paper. My kitchen counter looked lovely with the stacked decorated containers.
Here are some repurpose ideas:
PAINTED PLASTIC TUBS ON GOOGLE
PLASTIC TUB COVERED WITH PAPER ON GOOGLE TIPS: PLASTIC CONTAINERS CAN ALSO BE COVERED WITH FABRIC SCRAPS, WALL PAPER, CONTACT PAPER, YARN, & STICKERS. TIN CANS, COFFEE CONTAINERS, & BABY WIPE TUBS CAN BE COVERED TOO.THE POSSIBILITIES ARE ENDLESS. HERE ARE MY REPURPOSED CANS:
I was amazed when I saw crafts online made from recycled 2 liter soda bottles! There are endless possibilities once your creative juices start flowing! Cute Mother's Day gifts can be made from empty plastic 2 liter soda bottles. I didn't have any empty soda bottles. I just purchased cheap house brand sodas and poured the soda out. The bottles were cleaned and washed. I'll share some inspiration images to give you some creative ideas for your Mother's Day gift. You'll need some of the following items regardless of the gift idea you choose: Empty 2 liter plastic soda bottles, cleaned Scissors Plastic bottle caps Google eyes, pipe cleaners, buttons,etc Markers Potting soil Favorite plants Small rocks or marbles HAPPY FACE PLANTERS IMAGE #1
CRAFT IDEA FROM GOOGLE SEARCH
NOTES: USE SCISSORS TO CUT TOP OFF YOUR BOTTLE. HOT GLUE GOOGLE EYES AND BOTTLE CAPS FOR THE FACE. CHOOSE PLANTS THAT LOOK LIKE HAIR. REMEMBER TO PLACE ROCKS OR MARBLES IN BOTTOM BEFORE ADDING POTTING SOIL. IT HELPS WITH SOIL DRAINAGE. IMAGE #2
MY CRAFT IDEA NOTES: I DIDN'T HAVE GOOGLE EYES SO USE BUTTONS & PIPE CLEANERS PIECES FOR THE FACE. PUT ROCKS IN BOTTOM OF PLANTER FOR DRAINAGE. USED RECYCLED PLASTIC JARS FOR MY PLANTERS. THE JAR TOP WAS USED AS PLANTER SAUCER. I DECIDED TO USE CUTTINGS FROM THE PLANTS ON MY PORCH. IMAGE #3
CRAFT FROM GOOGLE SEARCH NOTES: CUT PLASTIC BOTTLE WITH EARS AS SHOWN IN IMAGE. USE WHITE SPRAY PAINT ON THE BOTTLES. YOUR PLANTER. DRAW CAT FACE WITH MARKERS. 2 LITER & 3 LITER PLASTIC BOTTLES WERE USED.
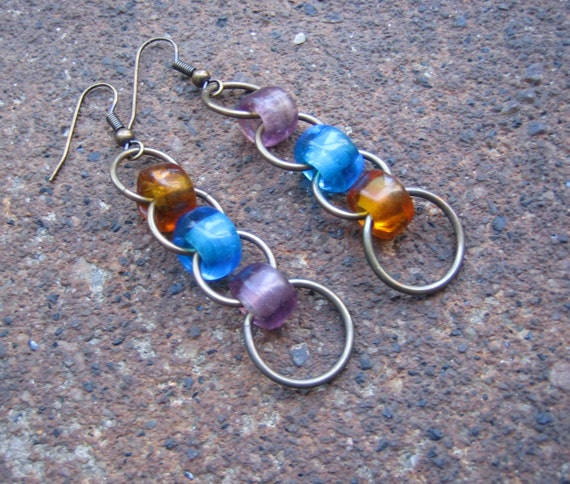
I often avoided crafts with buttons and pony beads. I thought they were used for girl and teenager jewelry. Well, I stand corrected. The jewelry design makes the difference! The earring's I'm sharing today are just right for adults. I added aYouTube tutorial at the bottom ifyou are new to jewelry making. I saw these pony bead earrings online and thought they were nice looking:
DESIGN INSPIRATION :
PONY BEAD DROP EARRINGS NEED: Assorted color pony beads Large Jump rings Fish hooks earring ear wires Jewelry tool pliers You can make your earrings solid color or mixed colors.I placed a bead on the top and bottom of each jump ring. I didn't like the design shown in the picture so I tweaked it a little. Select your beads. Use your pliers to open the jump rings. Add the beads to the jump rings as shown in the picture. Open the fish hook ear wire and add the beaded jump rings. These earrings are so quick and easy to make! I made earrings to match all of my casual outfits! DESIGN INSPIRATION:
DANGLE BUTTON EARRINGS I saw these on Pinterest and my creative ideas started flowing. Most Craftershave a jar full of loose buttons. I was so excited because I found a use formy button collection. Packets of small buttons are cheap at the fabricand craft stores if you don't have any buttons. I also recycled buttons fromold shirts my family were no longer wearing. NEED: Assorted color small buttons Large Jump rings Fish hooks earring ear wires Jewelry tool pliers Select three buttons. It doesn't matter whether you use two hole or four hole buttons. Make sure you place jump ring in the same button hole on each button. This method will ensure that your earrings dangle correctly.Look at the hole selection in the picture if necessary. Add jump rings to the top and bottom holes of the first and second buttons. The third button only need jump ring in the top hole. Consult picture design. Open the fish hook ear wire and add the three buttons. I had fun making button earrings because the design possibilities are endless. I did find some fancy designed buttons at the fabric store.I bought animal print buttons online from Oriental Trading Company. I received a lot of nice compliments on my animal print earrings! BUTTONS @ ORIENTAL TRADING:
I saw this Suncatcher project on a "Crafts for Kids " web site. I thought that this was a nice craft for adults too. I got more creative after I made a few of them.
ITEMS NEEDED: ASSORTED COLOR GLASS GEMS RECYCLED PLASTIC LID WHITE OR CLEAR SCHOOL GLUE PIECE OF YARN OR RIBBON SUCTION CUP (OPTIONAL) Here's some helpful tips:
* Buy FLAT glass gems. * Can use small beads to fill in areas between gems. * 2 or 3 Dollar Tree net bundles ok (Depends on lid size). * Clear deli lid ok but margarine & whip cream lid works too) * White Elmers school glue ok if you don't want to buy the clear. * Suction cup may not be necessary. My window had a hinge hanger. * Have old towel OR paper towels handy since glue can be messy! * I suggest hanging Suncatcher inside. Exposure to the weather may damage it. INSTRUCTIONS: Fill the entire lid with glue. Lay the gems in a pretty design on top of the glue. Cover your design completely with more glue.
Let the Suncatcher air dry 2-3 days.
The glue should be clear and gems bonded together.
Peel lid from your project and poke hole at top for the ribbon.
I wind down on the week-end by doing easy week-end crafts or gardening projects. They range from stretch bead jewelry to simple wood crafts. Most of these crafts can be completed in one or two days. I saw a wooden pallet mug holder on Pinterest. I had to do it this clever craft. My son helped some. He furnished the pallet and had a wood burning kit. He did the lettering. Here is my Pinterest inspiration:
Here is my version of this craft:
I tried staining the wood with strong tea but it wasn't dark enough. I had to use some left over deck stain. The black hooks were too expensive! I did find some gold mug hooks at a discount store $2 for pack of 10! I hope you'll try this as a week-end project! The pallet was free. A lot of businesses and construction sites have them thrown in a pile outside. Just ask before you remove one off their property!